The Simple Indoor Seed Setup That Gardeners Swear By
Indoor Seed Starting Setup: How to Grow Strong Plants Before Spring
Starting seeds indoors is one of the most satisfying parts of gardening. Long before the weather warms up outside, gardeners can begin growing healthy plants right at home.
With a proper indoor seed starting setup, you can grow vegetables, herbs, and flowers weeks before outdoor planting season begins. This gives plants a strong head start, often leading to healthier growth and bigger harvests later in the year.
The good news is that you don’t need a complicated greenhouse or expensive equipment. A simple and well-organized indoor setup can produce excellent results.
Here’s everything you need to know to create an effective indoor seed starting system.
Why Start Seeds Indoors?
Many plants require a long growing season. If you wait until outdoor temperatures are warm enough to plant seeds directly in the ground, some crops may not have enough time to mature.
Starting seeds indoors solves this problem.
Gardeners often start seeds inside for plants such as:
• tomatoes
• peppers
• herbs
• lettuce
• flowers like petunias or marigolds
Indoor seed starting allows plants to develop strong roots and leaves before they are transplanted outdoors.
It also gives gardeners more control over growing conditions.
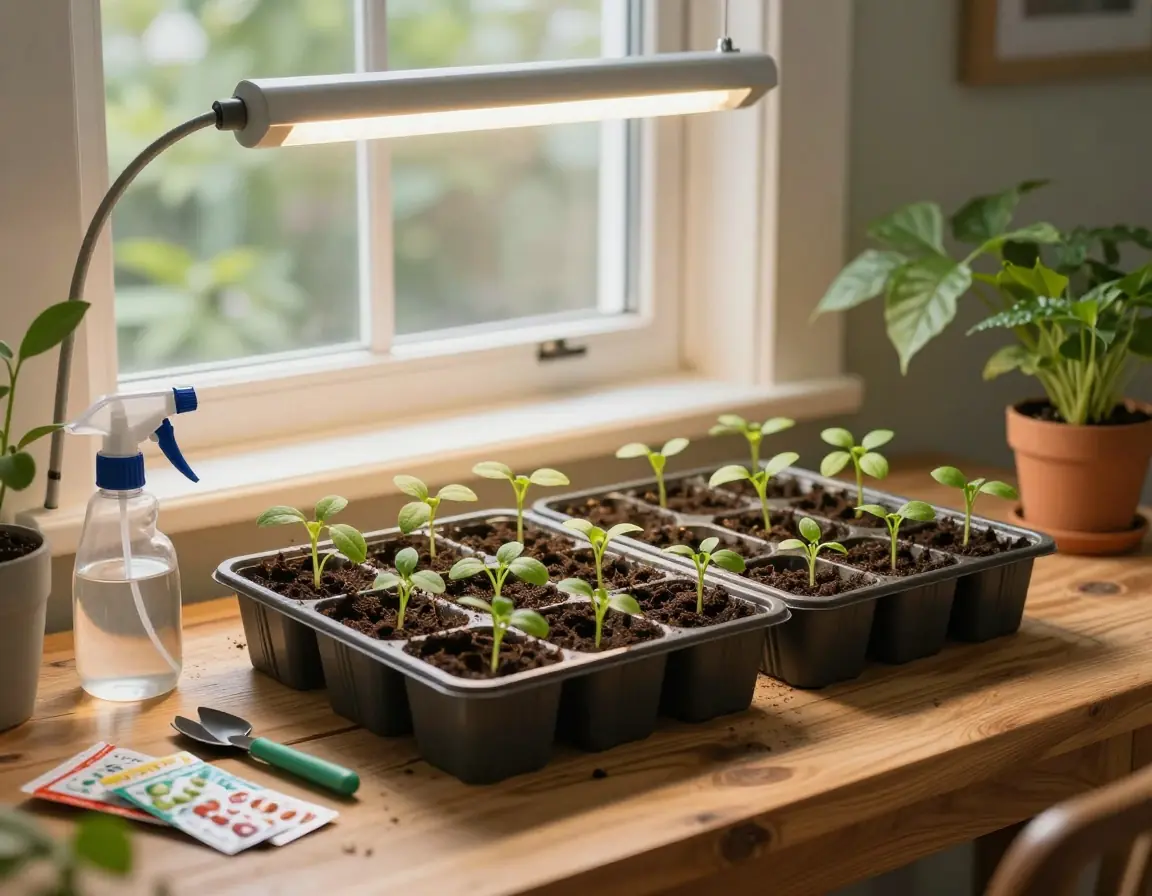
The Basic Equipment You Need
A successful indoor seed setup requires only a few simple tools.
Seed Trays or Containers
Seed trays are the most common containers used for starting seeds. These trays have small individual cells that allow each seedling to grow separately.
You can also use small pots, biodegradable containers, or even recycled items like yogurt cups with drainage holes.
The most important feature is proper drainage so excess water does not accumulate.
Seed Starting Mix
Regular garden soil is usually too heavy for young seedlings.
Instead, gardeners use a seed starting mix, which is a lightweight blend designed to hold moisture while allowing air to reach delicate roots.
Most seed starting mixes contain materials like:
• peat moss
• coconut coir
• vermiculite
• perlite
This loose structure encourages healthy root growth.
Grow Lights
Light is one of the most important elements for healthy seedlings.
While a sunny window can sometimes work, it often doesn’t provide enough consistent light.
Many gardeners use LED grow lights placed several inches above the seedlings.
Grow lights help prevent seedlings from becoming tall and weak — a problem known as “leggy growth.”
Most seedlings benefit from 12 to 16 hours of light per day.
Heat Mat (Optional but Helpful)
Some seeds germinate faster when the soil is warm.
A seedling heat mat placed beneath the trays gently warms the soil and can improve germination rates for plants like tomatoes and peppers.
While not always necessary, heat mats can make a noticeable difference for certain crops.
Watering Tools
Seedlings are delicate and should be watered gently.
Many gardeners prefer using:
• spray bottles
• small watering cans with fine spouts
• bottom watering trays
Bottom watering allows the soil to absorb moisture from below, encouraging deeper root growth.
Step-by-Step Indoor Seed Starting
Setting up your seed trays is simple.
Step 1: Fill Containers With Seed Mix
Fill each cell or pot with seed starting mix, leaving a little space at the top.
Lightly press the soil but avoid compacting it too much.
Step 2: Plant Seeds
Place seeds according to the depth recommended on the seed packet.
Some seeds should sit just below the surface, while others need deeper planting.
Cover gently with soil if needed.
Step 3: Water Carefully
Moisten the soil without flooding it.
The soil should feel damp but not soaked.
Step 4: Provide Light
Place trays under grow lights or near a bright window immediately after planting.
Consistent light helps seedlings develop strong stems.
Step 5: Monitor Growth
Seeds can germinate anywhere from a few days to several weeks depending on the plant variety.
Once seedlings emerge, continue providing light and keep the soil lightly moist.
When to Transplant Seedlings Outdoors
Eventually, indoor seedlings will be ready to move outside.
Before transplanting, it’s important to harden off the plants.
Hardening off means gradually exposing seedlings to outdoor conditions over about one week.
Start with short periods outside in mild weather, increasing exposure each day.
This helps plants adjust to sunlight, wind, and temperature changes.
Common Mistakes When Starting Seeds Indoors
Even experienced gardeners sometimes encounter problems when starting seeds.
A few common mistakes include:
Not enough light
This often causes seedlings to become tall and weak.
Overwatering
Too much water can lead to root rot or fungal issues.
Planting seeds too deep
Seeds planted too deep may struggle to reach the surface.
Starting too early
If plants grow too large before outdoor conditions are ready, transplanting becomes difficult.
Following seed packet instructions can prevent most of these issues.
Why Indoor Seed Starting Is So Rewarding
There’s something incredibly satisfying about watching tiny seeds transform into healthy plants.
Indoor seed starting allows gardeners to participate in the entire life cycle of their plants, from the earliest stages to the final harvest.
It also opens the door to growing unique plant varieties that may not be available as seedlings in garden centers.
With just a few simple tools, a little patience, and plenty of light, anyone can create a thriving indoor seed starting setup.
And once those first tiny green shoots appear, it becomes clear that spring has already begun — even if it’s still cold outside.
If this inspired you to start your own garden, share it so more people can discover how rewarding indoor seed starting can be. 🌱